Tuesday, 2 April 2013

Flight Software

I've been busy with the software to control handle the telemetry for RAMFly... 
Sadly (and as is often the case) I've spent a while battling with the development tools. 
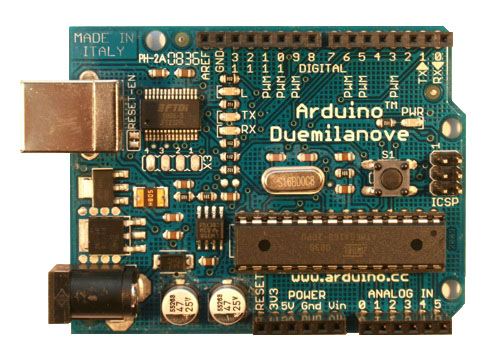
Ramfly's current processor...
The main controller hardware is an Arduino (currently an Arduino Duemilenova - see right) but soon to be replaced with a Mini Pro.  The standard Arduino development environment is good, as far as it goes, but makes it a bit difficult to get 'proper' software engineering going for folk like me who appreciate a fully featured IDE to help manage things. Creating and managing multiple source files / libraries etc is just not its thing. The standard tool does a good job of managing the build/upload process, but the editor is (IMNSHO) clunky and confusing.
At work, I live in Netbeansso I took it upon myself to investigate whether it could be used to develop Arduino code. Google revealed a few articles and the Arduino website has a page on the subject but it's a bit dated and relates primarily to building a Mac environment... 
I discovered a netbeans plugin that's quite new but helps a lot. It works alongside the C++ Netbeans module. The installation instructions on the plugin homepage are excellent and the author, Jaques, is very helpful. The plugin wraps the compile/upload process very well (you just need to manually add "upload" as a makefile target for Netbeans). However, that left me looking for a terminal/serial monitor. There are plenty of serial 'console' apps that can do the job, but ideally I wanted something integrated...  Searching took me to the rs232 plugin at java.net .  This project looks like it has grander plans, but for now I just grabbed v0.2 of the above plugin, installed it into netbeans and it works really well. So now I have my familiar Netbeans environment, auto formatting, code completion, 'on the fly' syntax checking, automatic code builds and uploads and a serial console. Pretty cool.
But, and there's always a 'but', it seems to get things wrong sometimes. Incorrectly flagged syntax errors, and a makefile corruption that occurs randomly. I can't (yet) find what's corrupted, so I end up having to create a new project, import the source files and then rebuild. I don't think the plugin is involved but the Makefile provided maybe.
Still to do: The Makefile still rebuilds the entire library on every build (as does the standard Arduino tool). It doesn't take long but that's not the point ...
Saturday, 23 March 2013

Receiving aerial

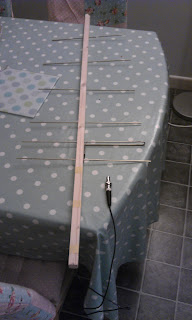
Had a go at making a YAGI:


its 3' long & the soldering on the element will need doing properly
The bars are not glued in yet either, but it does have a female BNC connector on the end


Tuesday, 19 March 2013

Auto pictures from camera

The Canon powershot A490 turned up & I managed to get the hack kit onto the SD card.

There is a standard script for automatically taking photos after a set time period, so I tried it looking out of the back window:


(must be pretty near the top of the 'most boring video' stakes!)
There were just under 500 pictures taken over 4 hours, at 1 shot / 30 sec, before the batteries ran out.  This was all with the screen on (I've not managed to get the script to turn it off yet) so should last for a 5 hour balloon flight.


Tuesday, 12 March 2013

Cameras

Asked around to see if anyone had a camera they didnt want any more.

Someone found this for us:


Its a 2Mp camera from a good while ago, with only a few drawbacks...

it doesnt seem to work & it weighs about 650g.  Might take it apart and see if there is anything useful we can harvest from it.

Looking at another balloon website, it was talking about the Canon A490 :


Only weighs 170g

& I see that it is one of the Canon cameras that you can hack with the Canon Hack Development Kit
http://chdk.wikia.com/wiki/CHDK
Seems you can program things like time lapse or 1 photo every 30 sec, just by adding a script to the cameras SD card

So I ordered one from ebay :)

Saturday, 9 March 2013

Collecting temperature & pressure

Got a small board measuring pressure and temperature:

the PCBs are (L to R)
temp/press/altitude monitor
GPS
microSD card board
compass unit (not much good)

Arduino sketch for the temp/pressure chip works fine, sketch for GPS works fine, but I'm struggling to merge them so that it can log both

Then, might be worth logging everything to SD card as well as sending the data to be transmitted


Thursday, 7 March 2013

Insulation

Found this polystyrene box at work


It's probably a bit big for what we need, but it's nice and thick.

Unfortunately, I weighed it & it's a fraction under 300g - I think we are going to have to be careful of our all up weight!


Wednesday, 6 March 2013

RAMFly can sing ....

Well actually, more like tweet (like a bird, not like a teenager...) 

I spent way too long again last night, but eventually I got a basic radio telemetry setup working. I can now transmit information a massive 1.5m across my desk. That's without antenna and other required things which should boost the range to many Km.
Ramfly transmitting dummy data across my bench - click to expand
Here you can see my receiver collecting strings from the RFM22B. The second line has a receive fault (but the spelling mistake is all mine ... :) This was at 50 bps, 100+ proves very unreliable. However, remember there are no antenna though. The blue/yellow band at the bottom of the image is called the 'waterfall' and allows you to visualise non visual energy. Yellow/Red indicates energy and the darker parts silence. You can see here a 1200Hz sound and 1675 Hz sound. These are the sounds produced by the SDR radio in response to frequency shifts and corresponding Upper Side Band (USB) frequency compared with the reference frequency. The better the transmission the brighter/narrower the yellow/red bands will be. Although you can't see very well, there are two vertical red lines (directly beneath the red scale markers). These have to be very precisely aligned with the yellow/red waterfall marks to indicate the two frequencies produced by the payload. The horizontal blue band is the gap between two transmissions.

Wanna hear ramfly sing

The good chaps on freenode #highaltitude were very helpful. I was labouring under a misapprehension about how to set up dl-fldigi for a couple of hours - very frustrating

Tuesday, 5 March 2013

SDR

Well, that was harder than it ought to have been... Finally got the SDR working on my PC and (almost) on my laptop. The first problem was getting the SDR software, SDR#, to talk to the DVB-T dongle. Despite this being one of the approved ones, it still didn't want to play ball. Depending on where you look, there are a range of different recommended drivers...
Then it was extremely difficult to find a suitable variant (ahem) of the s/w needed to link the output of the SDR radio to the input of dl-fldigi. However, 4 hours later, I am now listening to Radio 1 on the most elaborate radio set-up you're likely to encounter... :)  
Time for bed I think...

Monday, 4 March 2013

Power

Figured we are going to need some battery packs, so I've ordered a few sizes:

9v clips
6 x AA
5 x AA
4 x AA
3 x AAA
2 x AAA

mostly like this from ebay:


All the arduinos seem to need 5v to run, but need 7-12v input voltage

might need to start adding up how much power we need vs weight of batteries

Friday, 1 March 2013

GPS log

Why cant I add pictures to a comment on a post?

Anyway, heres an hour or so of data collected from the GPS module
my house seems to be travelling a few knots, and hovering somewhere between 40 and 100 meters above sea level


GPS working


Looks like the GPS module working fine, (though not quite sure why my back window is doing 1.05 kts)
This one has its own ariel built onto the chip, and will also data log for around 16 hrs
Seems to work ok through the back window, so should be ok through a polystyrene box I reckon

output from Arduino:

Time: 13:48:4.0
Date: 1/3/2013
Fix: 1 quality: 1
Location: 5212.3139N, 0.3604E
Speed (knots): 1.05
Angle: 129.66
Altitude: 75.20
Satellites: 7


This was just using the stock Adafruit code, so we can strip it down & make sure the pins are correct for the payload

GPS - kit

GPS module turned up last night


plugged it into the breadboard by the arduino & now its time to start seeing if I can get it to work :)


The red pcb is a 3 axis compas module left over from the RAMboat project.  It might be useful to log direction of cameras on the balloon

Monday, 25 February 2013

SMS

I was thinking last night (always dodgy)..

We could also do with an SMS module to help with recovery once we've lost line of sight (LOS) with the payload (eg once it landed). One way we could do it is described here using $20 mobile phones. Basically we'd probably want the Arduino to sense a  mobile signal, and send an SMS every 10 mins or so containing the position of the ballon. We could also arrange to send it an SMS to do stuff (how about sounding a very high volume piezo alarm - like a fire alarm) to help with recovery?

Update 28/2/13: The module here looks just the job. At 36g it's pretty light and it only costs $47 delivered! Just add a SIM and hook up to an Arduino. At low altitudes, you could also use it to stream video over 3G...

Saturday, 23 February 2013

Suppliers

I suggest we keep a list of useful suppliers. Feel free to add new ones as you discover them

HAB Supplies            Electronic supplies for HAB. Seem to be at least as cheap as Ebay as much as I've seen 

Telemetry

I'll have a go at the telemetry then. At least the transmitting part to start with. There are a couple of modules that seem to be in widespread use
  1. The Radiometrix ntx2 - apparently the workhorse
  2. The RFM22B module.
The second is a more modern affair - has an onboard temperature sensor too. Both can be fairly readily linked to an Arduino w/out too much additional circuitry.

Update 24/02/13: I opted for the RFM22B because it might be more flexible - at the expense of being slightly harder to get started with.  I've also ordered a SDR dongle to test it with as well. I'll update here when it's arrived and I've had a play...

Update 26/02/13: The radio and SDR have arrived. I'll solder the header pins onto the module this eve and see if I can get it bread-boarded to the Arduino and read the onboard temp (or something).  It'll have to wait till Thursday till I can play with the radio/SDR properly ...

Update 28/02/13: Well, after some wrestling with the datasheet, I can now read the radio's oscillator temperature using the onboard (on radio) ADC and my arduino.


Here's the radio in its delivery box (I've already soldered the headers on)


and here's the radio breadboarded to the Arduino. Now, reading the temp may not sound that exciting - but it should be easy to extend the sketch to change the radio frequency using the same (similar) code. Thereby allowing us to transmit RTTY...


GPS


I'll have a go with GPS

See if I can get position reporting & logging without using the big heavy handheld GPS that I was using for RAMBOAT

I'll aim for nmea text reporting on the Arduino

Friday, 22 February 2013

Project goals?

Possible Goals ? (In no particular order)
1. Launch a balloon achieve >5km alt. Recover balloon. Capture some images.
2. Launch a balloon, achieve > 30km alt. Recover balloon. Capture images and video.
3. Launch balloon to > 30km. Lauch rocket to > 50km. Capture images and video of rocket launch
4 Launch balloon to > 30km. launch re-useable payload which flies back to launch site.